top of page
MUSTANG CULTURE
Splitting Headlight
AT YOUR OWN RISK
 1) Let me say that I do not recommend you proceed with this oven baking process unless you are prepared to take full responsibility for the outcome. This is simply a blog style demonstration of what I did to separate my headlight assemblies and as such I take no Responsibility for any failures or damage caused if you carry this method out. Here I started with an OEM sealed headlight assembly. TIP: I placed a towel on my bench to work on. | 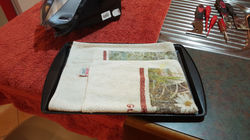 2) I next grabbed a baking tray big enough to sitmy headlight assembly on. I placed a Tea-Towel on the tray to keep the headlight assembly from coming into contact with the metal tray while in the oven. Tip: See my screw drivers and scrapers in the background... I just grabbed an array of tools to have on hand. |  3) I thought I might need a heat gun for later in the process. This is my Ryobi that has had more use than a Taxi Cab. I had a wide flat flange nozzle about 75mm or 3 inches wide. Tip: Notice the 100mm or 4 inch narrow tip screwdriver. haha...I grabbed that one at the last shed visit. |
|---|---|---|
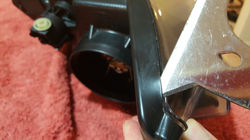
 4) Now pay attention!! This is the ONLY scraper I needed and believe me when I say it is the THE one/style to have. I got it from Bunnings in Australia but I am sure this type is available world wide. The circular cutout works as a hand grip and the triangular tip is the action end for this job. |  5) I Started off by removing the case screws. There are 4 in total. This is so that the heat does not concentrate more with the metal screws in place. (I am no expert but that was my consideration) |  6) I next removed the metal clip you see at left but I could not remove the light bulb housing. But I did remove the soft plastic cap that covers that housing as I feared it would melt in the oven. |
 7) TIP: I placed my bits and bobs into a plastic container. |  8) Now I really had no idea what temp to warm the oven. Based on youtube videos that said 220 (Fahrenheit) I went with 120 Celsius. Ours is a gas oven and I preheated for about 15 minutes. |  9) While the oven was warming I placed the headlight assembly onto the baking tray making sure that nothing contacted the metal tray. TIP: I tested that the headlight actually fitted into my oven before warming the oven. Mine only just fitted on an angle. |
 10) This was a scary moment. The heat hit my face and it was that moment of no return. | 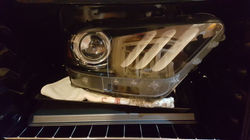 11) I had to place the light on an angle to avoid the corners coming into contact with the oven wall. I assumed that would be a disaster and the housing might melt if it did. I closed the door and waited for 15 minutes. |  12) Out she came... crispy hot to touch. I had no idea where to start so I just grabbed the scraper. |
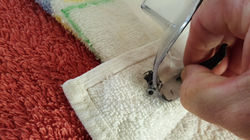
 13) I figured just start running the scraper along the seam line. Again, at this stage I had no idea other than what was intuitively kicking into my thought process. |  14) I just worked my way around. |  15) and around. |
 16) Suddenly I realized the black plastic was soft and I could turn the scraper in under the black outer channel as seen here. |  17) I got a bit gamer and started to go around again digging in harder. |  18) The black perma-seal started coming out. But the housing had now cooled. So back to the oven. It was frustrating though as I went back and forth to the oven 6 more times... 15 minute bakes for the first two and then I went 20 minute bakes for the last 4 times. I was beginning to worry if it would ever come apart as the perma-seal would cool and was not that stringy consistency that most youtube videos showed. In fact, I now know why no one shows this whole process... It really sucks! |
 19) So I got sick of the repetitive process taking so long and by the 6th bake I thought bugger it, and I pushed the temp to 130 degrees Celsius for 30 minutes. |  20) Back in for two more bakes at 130c for 30 minutes repeating the process each time. |  21) I grabbed the screwdriver and found the perma-seal was able to be dug out in large amounts. Seemed I was onto something here. |
 22) The black plastic was very soft and more pliable than I thought it would be. The lens itself was very solid. The perma-seal was a tough gasket rubbery consistency. |  23) Here you see I was getting impatient and began levering the plastic outward. The reason was I just did not know what or how far the channel structure went in. I was working blind for the this first attempt as nobody truly explains it on youtube. |  24) I then thought if I run the heat gun around to soften everything even more that it might help. I ran the temperature at 500c but worked it around very quickly so as to not damage anything. |
 25) I finally worked out that I could now hook the screwdriver under the lens edge and started prying it apart at the Tri-Bar DRL end. |  26) Now the lens was breaking away but the perma-seal was not giving away easy. | 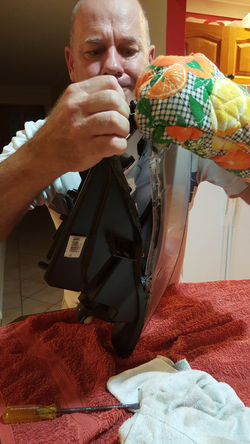 27) Now I could get my hand in and started pulling apart ever so hard! |
 28) It cooled. I didn't want to go through the oven process again so I just got the heat gun and ran around at 500c with a slow gradual movement. |  29) More screwdriver prying. |  30) More hand grappling |
 31) More heat gun |  32) More hand pulling |  33) BINGO! She finally popped open! |
 34) I realized a few mistakes now that I could see the full story with the channel and lens frame. The bottom seam line extends in very deep and was holding it tight. Next one I will work the bottom more before trying to pull it apart. | 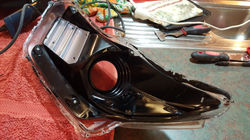 35) Some perma-seal still remains on the lens. Will clean that later. | 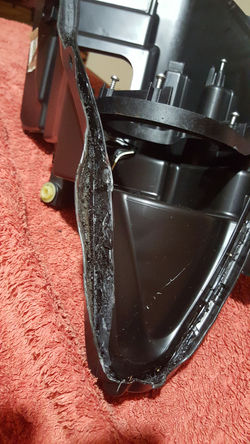 36) Look at the damage I did to the channel |
 37) Desperate times equals any measure! I heat gunned the channel until soft and then tried pegs to pull it back into shape. |  38) Was working OK but the surface was wavy. Then it struck me... Clamps with a plate either side! Off to the hardware tomorrow! |  39) So I bought 4 x 2 inch clamps and had a brain fart of an idea... door hinges! Yes, door hinges 1 x 4 inch, 1 x 3 inch and 1 x 2 inch to work as straitening plates. |
 40) They worked perfectly. Just heated up the plastic channel with my heat gun, placed the hinge over top and bottom side and clamped until it cooled again. |  41) All three in action. |  42) See how I was working the top plate nice and straight again. |
 43) Closer look |  44) Less heat and I found for curves I could clamp the heated outer end back to the cold inner end of channel to get shape back again. |  45) And look how perfect I got the shape back again. This is the same section as shown in step 36...! I was so excited at this stage. My headlight was coming back into shape again! |
 46) Now the tricky bit! The opposite "Rounded Corner" has a splayed curve. This is the corner where you pry apart (step 25) and it gets distorted badly. But I had an idea. I got some paper to make an inner channel stencil by running my finger around the top edge to make an impression. |  47) Now I marked 10mm offsets along the same line as a parallel dotted line. |  48) Now I joined the dots together. |
 49) Here I cut the shape out along my marked pen line. |  50) I placed the paper template over the end. See how far the outer channel plate is pushed out of shape. |  51) Another brain fart idea! Carpenters Gang Nail Plates. 190mm or almost 8 inches long. |
 52) Just bend the gang nail plate to follow the template shape. | 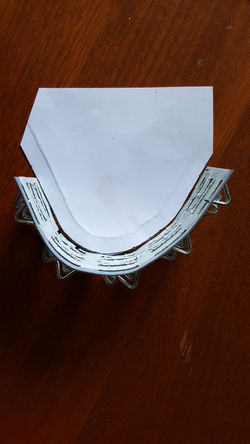 53) I Trimmed the plate length as shown here. I just need to get he tip shaped. |  54) I sat the plate over the tip just to confirm the right bend shape. |
 55) I realized the screw cowling was in the way. |  56) So I marked either side of the cowling. |  57) And cut away with tin snips. Easy as! |
 58) I heated the corner with my heat gun and then pulled the metal plate in hard and held until the plastic went cold again. About 2 minutes. | 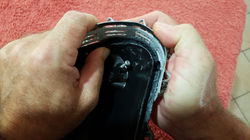 59) Looking down while cooling. |  60) Now its cooled and the shape is back. Just some flat edge waves to fix now. |
 61) Almost done now! | 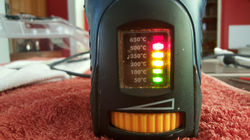 62) Back to the heat gun for a 500c heat blast. |  63) More clamping |
 64) working the final shape. The clamp on the end was protecting my rounded shape that i recovered with the gang nail press. |  65) I found as the plastic was 3/4 cooled I could do some tweaking with multi-grips. |  66) The final treatment. |
 67) Next I turned my attention to the lens and reflector housing. |  68) 4 screws hold the inner reflector assembly to the lens. |  69) After removing the screws I just pulled at this point and it popped out. |
 70) Both components are now separated. |  71) I will be painting the reflector and chrome black later before reassembly. |  72) I wrapped the inner component with cling wrap to keep it nice and clean until reassembly. |
 73) Now to clean the perma-seal off the lens. |  74) My trusty heat gun at 500c again should do the trick. |  75) I just held the heat for about 10 seconds. |
 76) The perma-seal was hot but soft enough to peel away with my fingers until it went cold again. |  77) TIP: I heated the screw holes to work out the perma-seal. This i thought would solve issues when I reassemble the headlight assembly. |  78) After heating I just gently screwed the screw back an forth until it eventually went all they way in. |
 79) I was very careful to take my time screwing back and forth. |  80) eventually it went in all the way in. |  81) I finally got to test fitting the two outer shells of the headlight assembly. |
 82) Given all of the destruction during initial opening of the headlight assembly I was very pleased with the final reconstruction lines. | 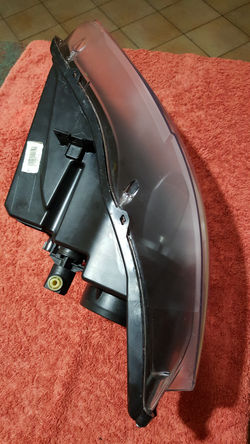 83) The top plate looks really good now. This is the only surface seen when the hood is open so is most critical. I never thought I would get it this good. Thank you Mr Heat Gun, clamps and door hinges...LOL | 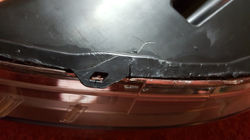 84) Underneath suffered some cosmetic issues but will not be seen once installed. |
 85) Housing resto complete. Both sections click in nicely with a good clean channel for re-sealing when I complete the internal mods. BUT... Check out the "Heat Gun Method Page". I developed this new method which is soooo much cleaner, quicker and NO OVEN required! |
bottom of page