top of page
MUSTANG CULTURE
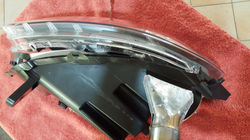
Splitting Headlight
AT YOUR OWN RISK
 1) Let me say that I do not recommend you proceed with this Heat-Gun process unless you are prepared to take full responsibility for the outcome. This is simply a blog style demonstration of what I did to separate my headlight assemblies and as such I take no Responsibility for any failures or damage caused if you carry this method out. For this method I used my trusted Heat-Gun with a 3 inch splayed nozzle. |  2) ADDITIONAL NOTE: All photos are retrospective photos. I had no one to help take the photos when I split this headlight assembly. Now back to my steps: I used this scraper and have proven it is the best type. The circular cut out is handy to grip with your hand at times whilst the pointy tip of the triangular section is the working end. |  3) I used this small screwdriver for digging the perma-seal out. It has a 2mm tip and shaft. |
|---|---|---|
 4) I set my heat gun to 500c. |  5) I started from the top and used the heat gun to warm the perma-seal. I only worked in sections of approx 4 inches at a time. I ONLY worked along the back corner of the outer channel molding NOT the front edge. This was very important. STEP 6 was VERY IMPORTANT for me to understand as well. |  6) IMPORTANT INFORMATION: Whilst this photo was taken after the split I needed to show this critical process. What I learned about this black plastic is when to STOP applying the heat. I found the point whereby when it SWEATS I needed to STOP applying heat. In this case, as a Demo I pushed it hard to enable the photo to clearly show the SWEATING. This sweating was my best friend, it was a critical measure! |
 7) This was my more optimal point to stop applying heat. Before the sweating reached the front edge of the channel. At this point the plastic is very pliable and the perma-seal was very workable. |  8) I sweated up 4 inch sections at a time working the back edge line only as explained in the previous steps. |  9) Once each section is heated I used the triangular section of the scraper to tuck in under the channel lip and pull along JUST to break the seal. NOT to DIG out the perma-seal. I learned in the oven bake method that if I tried to dig out the perma-seal with this scraper it bunches up and badly distorts the channel molding. |
 10) Once I broke the seal all the way around the headlight using the heat gun and scraper, I then again worked 4 inch sections heating the channel same as steps 5-8 BUT this time I used the small 2mm screwdriver to work out the perma-seal as if I was flicking it outward. I took my time and gently worked along approx 3 inches of the 4 inch section before it cooled off too much. |  11) I simply kept heating, digging out perma-seal and moving along. By having the heat gun temperature at 500c it made short work of it AND by using the SWEATING as the indicator when to STOP applying heat, and by NEVER BUNCHING the perma-seal I never once put the housing at risk of severe distortion as happened when I used the oven bake method. |  12) When I got to the screw cowelling's I took my time but made sure I dug out all of the perma-seal. I learned to be patient and just kept heating and digging out working my way around entirely. |
13) After digging out all of the perma-seal I then reapplied heat but this time I worked the heat gun all the way around the headlight housing 2 times over. By this stage I learned how to tell when the plastic was hot enough. With no perma-seal left in the outer channel edge I found the plastic heated very quickly. For this step I didn't sweat it off too much, just when I could see the first signs of sweating I moved along. |  14) Another IMPORTANT step: I learned after my first split that the lens slots into the housing on an angled slip-in arrangement from the top corner (Tri-Bar end) to down to the bottom corner (Reflector end) which is why they are so difficult to open as one tends to try and pry apart with a logical pulling of the lens and housing in opposite directions. So I learned this: Better to sustain slight repairable damage to the top corner and work this scraper method described in next step 15. |  15) I slipped the scraper's wider end in under between the housing and lens and wiggled it in until I had the scraper literally under the lens structure. I knew this had happened as the black outer channel lip pulls away (Distorts) and suddenly I felt the rigidness of being under the lens edge inside the channel. |
 16) This is a retrospective photo but I wanted to show how I am under the lens edge itself. By this time, the heat dissipated too much so I just re ran the heat gun around two more times until the housing seal channel was nice and hot again as in my step 13. |  17) With the scraper under the lens edge I simply twisted the scraper with much force until I could slip my fingers in between the lens and housing. |  18) I found it better to grip in this way with my arm over the lens face. |
 19) Once I had the corner open I ran the heat gun around again as it had cooled off. By the way, see the angle of the lens housing and how it locks in by slipping down on an angle into the receiving channel. If I tried to split from the opposite end at the tighter corner of the housing it splits at the screw cowelling and again at the lower cowelling on the same end and this is not repairable without gluing (this is what happened in the oven bake method before I knew better) |  20) All heated up again, I kept prying apart with my hands only and concentrating my hands at the top corner where the tri-bars are located. |  21) Here I am making huge progress and just kept pulling apart. |
 22) I Never attempted to pull from the back corner. Always from the front tri-bar corner. This was so important to keep the main body at minimal to no damage. |  23) Suddenly it separates. These are photos after the event and is why the lens is so clean of perma-seal. |  24) With a clean split, I have very minimal damage to repair but where there was damage it was easy for me to repair with my discovered process from the more dramatic damage I had to repair with the oven bake process. |
 25) Just a pic of the LED's inside the tri-bar sub-housing. |  26) The tri-bar sub housing affixes to a backing plate that is secured by 4 screws one at each corner. |  27) This is with the tri-bar housing removed and the tri-bars taken off. |
 28) Now I removed the remaining perma-seal by heating quickly with the heat gun and simply peeling away with my fingers. Tip: I found the perma-seal holds heat for a little while so I soon learned to be careful not to burn my skin with the perma-seal fully hot. |  29) I made sure I cleaned everything off well so that it would reseal with no issues caused by incompatible blending of sealing compounds between original and new. |  30) Even the thin remnants I cleaned off by quick heat and then rubbing back and forth with my thumb. |
 31) Once fully cleaned, I wrapped in cling wrap to protect the lens from being scratched or finger printed on the inside. (Later I am painting the chrome work and reflector black) | 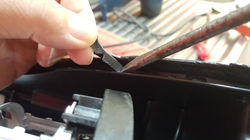 32) Now back to the black body of the housing. I cleaned the remaining perma-seal out of the channel with heat and a screwdriver blade that was 10mm. This is the perma-seal that sat between the lens and the inside section of the channel. I Just ran the heat gun around but this time pointed it directly inside the channel. IMPORTANT: I did not heat until it sweated this time. Just enough to soften the perma-seal slightly. Still at 500c but with quick back and forth motions for about 5 seconds. |  33) I simply heated sections at a time and once the 10mm screwdriver blade started to lift an end of perma-seal I was able to grip with my fingers and pull away until it broke off. Then I just kept repeating the process. |
 34) Here is the back corner fully cleaned. See how there is zero damage! That is because when I pulled and twisted apart with my hands and scraper I kept to the front corner only. This paid big dividends! |  35) Now to the damaged front end. Its actually not too bad at all. 50% less damage than the oven bake method at this front corner. | 36) To repair the front corner I used the same process I learned in the oven bake repair process. using the gang nail template system (as referenced in the oven baking method section at steps 46-56) I used the heat sweating technique (Photo for method reference only) to get good pliability in the black plastic. |
 37) Then using the gang nail template form the oven bake process repairs, I just turned the template upside down to cater for this headlight assembly being the opposite side and pushed in while the plastic was nice and pliable and held until the plastic cooled again. This took about 2 minutes to cool. |  38) First application of heat and gang nail template and I nailed it (Pardon the pun...lol). Perfect restore in my opinion! |  39) Although very minimal damage occurs elsewhere I still had a tiny amount of repair more so because I wanted it to be a perfect assembly when all finished. I just used my Heat, Hinge and Clamp method as described in the oven bake section of this site. |
 40) Tip: I learned that I could apply a little more heat to the back corner of the channel line while the hinges and clamps where in place which resulted in the clamp weight dropping the surface down further as if the plastic was hinged itself. But I kept a good eye out and stopped applying heat the moment the clamps started moving downward. This saves time removing, heating and reapplying the hinges and clamps. It becomes a once only setting up process. |  41) Look how perfect the channel is. This after splitting, cleaning out the perma-seal and minor restoration with the heat and bend process (Heat Sweating, hinging and Clamping) |  42) Good clean lines. No splits like was in the case of the oven bake process. |
 43) From another angle. |  44) And from another angle. |  45) Perfect (this end required nothing other than cleaning out perma-seal remnants from the channel. |
 46) Top section after minor resto work. I was happy with this result. |  47) Everything clicked back together nicely when I completed the job. My patience paid off at this point. All up it cost me 45 minutes to split the assembly and approx 1 hour to clean and repair back to this stage. This is why it was so important that I did not bunch the perma-seal when removing in the early steps of this process. that totally minimized the damage to the outer channel molding of the black housing section. | 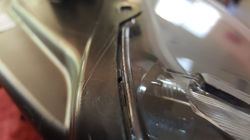 48) I was happy with this alignment and the gap was exactly to the built in spacer tabs attached to the black housing channel lip edge. |
 49) All buttoned up nicely. |  50) Housing screws back in place. |  51) All back together. IMPORTANT: I strongly stress that this was a success for me because I 1) Had learned a lot from the oven bake method which I will never do again, and 2) I took care and was patient throughout the whole process. But in saying this; Anyone attempting this method does so at their OWN RISK. I take NO RESPONSIBILITY for your failures should you try this method. |
bottom of page